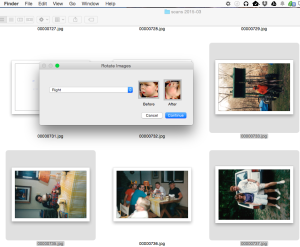
Windows Explorer will rotate a photo via right-click. Mac OSX doesn’t have this ability but it can be added with no additional software.
Steps to setup
1. Add the image rotate feature as a service using Automator. Detailed instructions are available but here are the quick steps
2. Open Automator and select File, New and pick Service
3. Change to Service Receives Image Files in Finder.
4. Drag Rotate Images action and select the Options for the action and tell it to Show Action. Save the Action named something like Rotate Images.
5. Open System Preferences then Keyboard and select the Shortcuts tab
6. Set a shortcut like Option-Command-R for the Service Rotate Images
Using in Finder
Select one or more photos in Finder and press the short key. You will be prompted for the direction of rotation (right, left, 180) and it will be applied to all selected photos.
That is it! Now, why would you do this rather than use iPhoto? iPhoto doesn’t save the changes to the original file. If you were to take the original into another program, it wouldn’t be rotated correctly. Mac Preview does have the ability to rotate the original file. Preview is inconvenient if you are trying to sort and rotate a large number of files.
